 |
PAINTING OF BANANA STEP BY STEP |
PAINTING OF BANANA STEP BY STEP
Here below a short exercise using an airbrush which will allow you to create a realistic painting. This painting which can be rapidly realized without many difficulties.
This work is particularly adapted for beginners who has just started using an airbrush ( you should know how to produce a small or big stream of paint with your airbrush without leaving any stains )
(brands names are indicative)
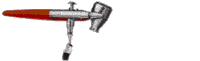
- Airbrush Paasche V, nozzle 0.2 mn
- Paper Shollers Hammer 250g, 22cm x 21cm
- Transparent masking film 25cm X 24cm
- Drawing pencil, eraser
- Paintings : Colorex Technic Pébéo
( Sepia, yellow Ochre, Raw Sienna,
Turtle Dove grey, Light blue )
- A small cutter
- A pair of scissors
- A rule
- Glass of water
- A dropping pipette
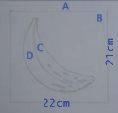
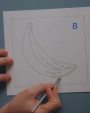
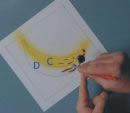
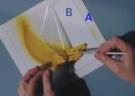
Click on the picture to enlarge 1- Draw with your pencil an 2 cm inside margin ( A ) on each side of the 22 x 21 cm "Shollers Hammers" paper
2- Draw the banana with pencil inside the frame ( B )or print it. ( If you choose to print the banana on your drawing paper, you will not be able afterwards to erase the pencil mark of the banana once your work is over ).
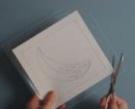
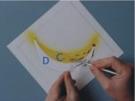
3- Unstick the 25cm x 24 cm self-adhesive transparent film from its support and lay it carefully on the drawing paper being careful not to leave any wrinkles and bubbles. He film must overlay the four sides of the drawing paper.
4- Use a pair of scissors to cut short the four corners of the transparent film just against the four corners of the drawing paper, as shown on the picture.
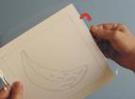
5- Fold down the four sides of the transparent film on the back of the drawing paper.
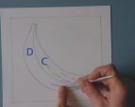
6- With a small cutter, cut the transparent film following all the pencil-drawing of the banana. Be careful not to press too much on the cuter to avoid leaving marks on the drawing paper. Do not forget to cut out the four side of the inside frame ( B ) helping yourself with a rule. Once you have finished the cut out, you may start painting the dark colors.
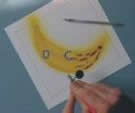
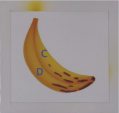
7- In the ( C and D ) parts only remove the pre-cut films corresponding to the brown parts of the banana, ( end of the banana + 10 brown marks).
As showed in the picture, use your cutter end to remove them. Use the support paper of the transparent film to lay the pieces of film in the same position as on the banana in order to replace them easily afterwards.
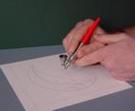
( Hold your airbrush as on the picture, helping yourself with your left hand for a better stability )
8- You will pour 4 drops of water and 2 drops of Sepia in the container of the airbrush
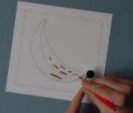
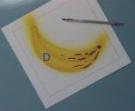
9- Slowly spray each brown pars of the banana one by one (nozzle of the airbrush must be at 2 to 3cm above the paper). It will take several passes on the each mark to get the expected dark brown color. ( the more often you will go over the color, the darker it will become ).10- Once you have finished with the brown color we are going to paint the banana in yellow.With the cutter, remove the film from all the ( C ) part of the banana. Put this part ( C ) with the others on the support paper of the film. Do not replace now the pieces of the brown parts of the film )
After you have removed the film ( C ), erase the remaining pencil drawing still visible around the brown marks and all along the banana. The part ( D ) remains with its mask.11- You will pour 3 drops of water and 1 drop of Yellow Ochre color in the empty container of our aerograph.
12- Pray the part ( C ) (nozzle at 7 to around 10cm above the paper) following carefully the curve of the banana. Go over several times with your airbrush in order to get the expected yellow color.
14- Now, you must replace carefully in its position the film of the part ( C ) in order to mask the banana.( no need to replace the films of the brown marks )
17- The yellow color which has now become darker will be sprayed all along the lower part ( D ) and a little bit all long the upper part. A strip in the middle of this part ( D ) will not be sprayed and will therefore remain in yellow Ochre color in order to give the shape of the banana.
Spray continuously by passing several times over the same place always following the curve of the banana shape until you get the correct dark yellow color.( The lower pat ( D ) will have to be darker than the rest of the banana.
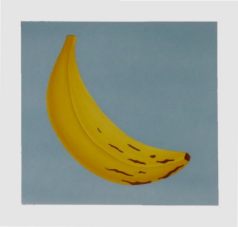
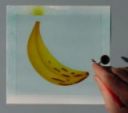
19- Phew ! You have now finished with the banana.20- But you still have to paint the background.
Remove the transparent film ( B ) but leave the film of the frame ( A ). Then, erase all the remaining pencil drawing still visible.
At this stage, the banana must be completely covered with the film as on the picture. ( Please check )
Start spraying from left to right and a little past the edges of the paper starting from the upper part of the drawing. ( You must hold the airbrush with one hand ). You will spray without stopping progressively down the page then up again in the same way and several times until you obtain the expected color.
In order to obtain an evenly plain color for the background, it is recommended to spray lightly with several passes ( after each pass the color will darken) rather than one or two passes of thick layer of spray )23- The moment of truth has now come!
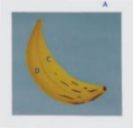
The last things to do now are to remove thoroughly the transparent film from the banana ( C and D ) and from the outside frame ( A ) helping yourself with the cutter and…to admire your achievement.24- In order to protect the paint you can spray 2 or 3 layer of clear varnish for acrylic paint.